About
This page will tell you how you can set your own Soentoo up in just a few steps.
Step 1: Grabbing the files
You first need to download some files (besides the Soentoo files). This would be:
- Gentoo Stage3-Installation i586 file (e.g. from here)
- Gentoo Portage snapshot (e.g. from here)
- A current kernel (e.g. from here)
- A kernel patch (which fits your kernel, from here) Only needed for kernels <= 2.6.11
In my example, I will use the following files (and I know they work):
- Gentoo Stage3-Installtion: stage3-i586-2006.1.tar.bz2
- Gentoo Portage snapshot: portage-20070403.tar.bz2
- A current kernel: linux-2.6.20.4.tar.bz2
- Not needed anymore: (A kernel patch: net4801.kernel.patch_v2_2.6.9)
You may (and should), of course, use more recent images... In this Howto I use the
Stage3-Image 2005.1, but only because I'm too lazy to redo all the screenshots. 2005.1 (or later)
works great!
Extract all Soentoo files into a directory (in the example, it'll be "Soentoo-0.04/") and place
all files you downloaded in there:
acer joe [~]: ls Soentoo-0.04.tar.bz2
-rw-r--r--  1 joe users 52K   17.08.2005 23:05:12 Soentoo-0.04.tar.bz2
acer joe [~]: tar xfj Soentoo-0.04.tar.bz2
Step 2: Configuring the Soentoo Setup
This really is easy. Change to the "Soentoo-0.04" directory and type "./Configure_Soentoo":
acer joe [~]: cd Soentoo-0.04
acer joe [~/Soentoo-0.04]: ./Configure_Soentoo
You'll need to have "dialog" installed for this to work (which you are very likely to already
have). Alternatively, you can edit the "Stage1.conf" and "Stage2.conf" configuration files,
which are pretty self-explanatory. There will be three configuration screens which I will
explain in detail:
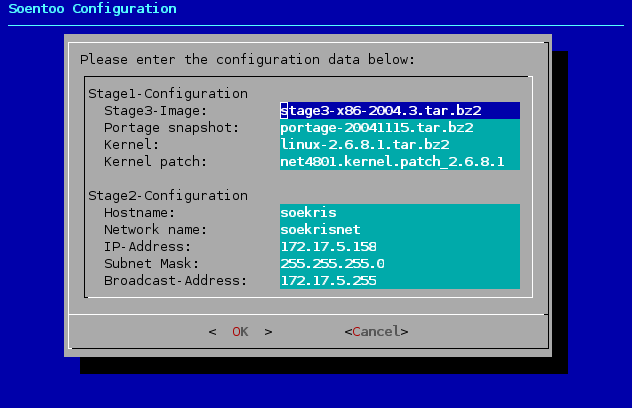
First dialog:
| Item | Description |
| Stage3-Image: | Enter the filename of the Gentoo Stage3 image you downloaded. |
| Portage snapshot: | Enter the filename of the Gentoo portage snapshot you downloaded. |
| Kernel: | Enter the filename of the Linux kernel source tree you downloaded. |
| Kernel patch: | If you'd like to patch the kernel you downloaded, enter the filename to the patch here. If not, you can leave this field empty. Patching with the appropriate Soekris Kernel patch is highly recommended, though. |
| Hostname: | The hostname of your Soekris box, i.e. how your box will be called on the network. |
| Network name: | The domainname of your Soekris box, i.e. how the network is called on which your Soekris box is connected to. |
| IP Address: | The IP address of eth0 (e.g. 192.168.1.123). |
| Subnet mask: | The subnet mask of eth0 (e.g. 255.255.255.0). |
| Broadcast address: | The broadcast address of eth0 (e.g. 192.168.1.255). |
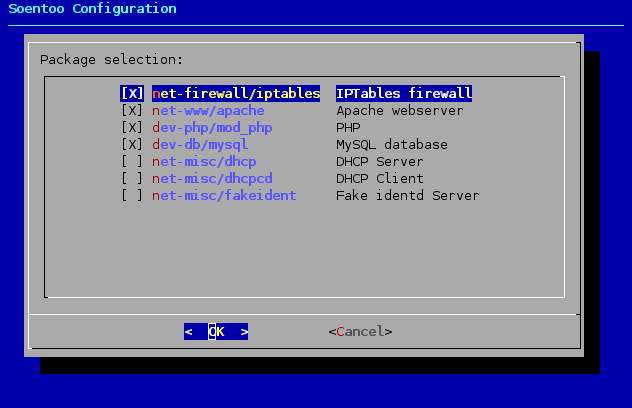
The second dialog lets you select what packages you want to install. You will need
to watch the overall size of the distribution yourself as it may well exceed 128MB
when you select everything.
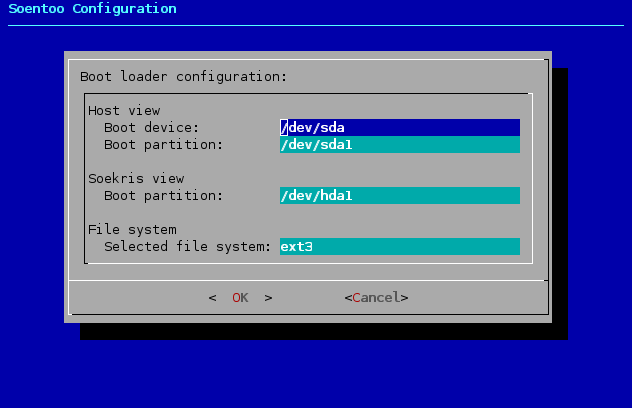
Third dialog:
| Item | Description |
| Host view boot device: | This is the device which your Soekris will boot from from the host computer's perspective. This means when you install Soentoo on a CompactFlash card which will be recognized by your card reader as /dev/sda, enter this here. |
| Host view boot partition: | This is the partition which your Soekris will boot from from the host computer's perspective. This means when you install Soentoo on a CompactFlash card and the partition where you put all the files would be /dev/sda1, enter this here. |
| Soekris view boot partition: | This is the partition which your Soekris will boot from from the Soekris's perspective. Usually this will be /dev/hda1, because your Soekris will detect the CompactFlash card as the primary master hard disk and you'll probably install Soentoo on the first partition. |
| File system: | The file system which you will use on your CompactFlash disk. I use ext3 here. You'll of course have to take care of the correct formatting of the partition yourself. |
Also note that in the third step of the configuration nothing is written to any bootsector or whatever. So during configuration you can't break anything on your harddisk. This is just a nice interface to configure /etc/lilo.conf and /etc/fstab in your Image directory. However, as soon as you run lilo, you should be sure these settings are correct!
Step 3: Bootstrapping Soentoo
This is almost as easy as configuration: Just type in your Soentoo-directory (as root)
acer joe [~/Soentoo-0.04]: su
Password:

acer [~]: cd /home/joe/Soentoo-0.04
acer [/home/joe/Soentoo-0.04]: ./Create_Image
And it will magically install itself! The setup has very little verbosity. If you would like to know more and watch the installation process, you can switch to another terminal and follow the files "Soekris_Stage1_Debug.log". You can do so by typing
acer [/home/joe/Soentoo-0.04]: tail -f Soekris_Stage1_Debug.log
As soon as the Stage1-installation is finished, it will automatically switch to Stage2 (e.g. chrooting to the created environment, emerging packets and so on). You can then follow the installation progress by typing
acer [/home/joe/Soentoo-0.04]: tail -f Image/soekris/Soekris_Stage2_Debug.log
The whole process should somewhat look like this.
Step 4: Customizing Soentoo
When it all went fine, you have a working Soentoo in the "Image/" path now. You can chroot to the environment by issuing a
acer [/home/joe/Soentoo-0.04]: cd Image
acer [/home/joe/Soentoo-0.04/Image]: chroot .
acer [/]:
From there, you can emerge packets you'd like to additionaly have or remove files which you don't want to have on there.
Step 5: Stripping Soentoo
In order to make Soentoo really tight and small, there are stripping scripts included.
If you are installing on a hard disk and don't need to care about the space, you can
skip this step.
Do the stripping only after you've done everything else! You will
not be able to emerge anything anymore after this point, as portage itself will be
removed. You might want to backup the whole "Image/" tree in case you want to change
something and don't want to re-emerge all packets. As soon as you're ready for stripping,
chroot to your new environment and type:
acer [/]: cd /soekris
acer [/soekris]: ./Strip_Image
Please make sure you're really in the right environment! This is very important. Although there are a number of safety features installed, I do not want you to strip down your "real" Gentoo installation. This would be quite unfortunate... So please ensure you're really chrooted to your Soentoo-tree (see step 4).
Step 6: Installing Soentoo to a CompactFlash card
On your CompactFlash card, you should create one (primary partition). It should take up the whole space of the CF card and be of type "Linux". You should format this partition with the ext3 file system. Say you've already mounted it to "/mnt/CFCard", you should then type (in your normal environment, in the Soentoo tree):
acer [/home/joe/Soentoo-0.04]: umount Image/proc
acer [/home/joe/Soentoo-0.04]: cp -R -p Image/* /mnt/CFCard
acer [/home/joe/Soentoo-0.04]: cd /mnt/CFCard
acer [/mnt/CFCard]: chroot .
acer [/]: lilo
When you're all done, leave the chroot-environment by hitting Ctrl-D. Then unmount the CompactFlash-Disk. Congratulations! You've set it all up!
Step 7: First steps with the Soekris
Now what you should do is reconnect the CF card to the Soekris box. Then you should
hook up a null-modem cable to the serial console and to the serial port of your PC.
Before plugging in the power cord into the Soekris box, start a terminal application
on the PC (I use minicom for that
purpose). Configure it so that its baudrate is at 19200 Baud, 8 Databits, no parity and
1 Stopbit (19200, 8, N, 1).
Then plug in the power of the Soekris. You should see how the RAM counts up to the
amount you have and then, after the correct boot device was selected see the LILO prompt.
You won't have to do anything, it will start booting itself. As soon as you start
seeing kernel messages, you've done it!
When booting off a serial console, the whole thing should somewhat look like
this. When you then ssh to your box,
this will most likely look like this.
General information about the setup
The box is by default configured so that eth0 has the IP you selected during
configuration. sshd is also automatically started, so you can immediately start ssh-ing
to your box. There's by default no user configured, just "root" (who may also log in
at the serial console).
The default password for the "root" user is "soekris".
Troubleshooting
In case anything goes wrong, or in case everything works fine, please drop me a note in
my guestbook!
I can also be reached via eMail: 
